


EMEET PIXY Wireless
4K HDR高画質、完全ワイヤレス&AI 自動追跡で自由な撮影体験
¥29,999
¥34,999
通常価格
Tax included.
Shipping calculated at checkout.
完全ワイヤレスで自由に
PIXY Wireless がケーブルの束縛を解消。屋内・屋外を問わず、シームレスに撮影を行えます。
AI 自動追跡機能搭載
スマート AI 追跡により、動きを自動追跡。一人撮影を手軽に実現します。
簡単マルチカメラ連携
複数台カメラを簡単接続し、スマホひとつでリアルタイムに画角を切り替え可能です。
究極の 4K 高画質映像
細部まで鮮明に描写。鮮明度の高い 4K 録画、鮮やかな色彩とシャープな映像でプロ仕様のコンテンツを作成できます。
長時間バッテリー&簡単ライブ配信
最大 8 時間の連続使用に対応。ワンタップで複数プラットフォームへ配信でき、いつでもライブ配信に対応可能です。
Quantity:
Inquiry Form

EMEET PIXY Wireless
4K HDR高画質、完全ワイヤレス&AI 自動追跡で自由な撮影体験


Fast, Free Shipping
Refundable in 30 Days
Exclusive Extended Warranty
Hassle-free Customer Service


EMEET PIXY Wireless
¥29,999
¥34,999
通常価格
詳細一覧
スペック
よくある質問
マニュアル

ワイヤレスAI PTZカメラロボット
EMEET PIXY Wireless
ワイヤレスで、自由に創造を
真のワイヤレス自由

AI自動追跡

4K30FPS & 1080P60FPS

HDRサポート

簡単ワイヤレスマルチカムセットアップ

ワンクリックマルチプラットフォーム配信

8時間終日バッテリー

EMEET STUDIO

制作を効率化

ワイヤレス接続
制限なく創造を
スマートフォンでPIXY Wirelessをワイヤレスで接続・操作。どこにでも置いて、 完全な自由で撮影できます。

AI自動追跡
常にフレームの中に
高度なトラッキングアルゴリズムにより、PIXY Wirelessはリアルタイムであなたの 動きを自動検知・追跡。ソロスポーツやライブセッションなど、ハンズフリー撮影に最適です。

ジェスチャーコントロール
シンプルなハンドジェスチャーで、AI追跡を即座に開始・停止できます

AI強化
PIXY Wirelessはデュアルカメラデザインを採用し、高速な動きやダイナミックな シーンでも、より正確で安定した認識を実現します。

UHD 4K映像
没入感のある4Kクオリティ
クリアな4K解像度で撮影。室内外問わず、鮮明でリアルなコンテンツを実現します。


HDRサポート
リアルな光を再現
HDRはハイライトとシャドウのディテールを保持し、複合照明や逆光環境でも より鮮明な映像を提供します。


簡単マルチカムセットアップ
スマートフォンを使って複数のカメラをワイヤレスでセットアップ・切り替え。 複雑なハードウェアは不要です。
1つのストリームで、複数のオーディエンスへ
EMEET STUDIOを使えば、複数のプラットフォームに同時にライブ配信。 手間を倍増させることなく、視認性とリーチを最大化できます。

長時間セッションのために設計
最大8時間のバッテリー寿命で、トレーニングセッション、ライブ配信、イベント全体を 通してPIXY Wirelessが活躍。頻繁な充電や電力の心配は不要です。

広角97°視野角
すべてのフレームでより広く
広角かつ自然なパースペクティブ。スポーツ、トレーニング、様々なダイナミックな コンテンツ制作に最適です。

ポータブルデザイン
どこへでも持ち運べる
コンパクトで持ち運び便利。専用キャリングケース付属。


48kHz内蔵マイク
48kHz内蔵マイクで、トレーニングやライブセッション中の音声収録が便利に。

外部マイク用3.5mmジャック
3.5mmジャックで外部専用マイクを接続し、よりイマーシブなオーディオ体験を実現できます。


縦向き撮影またはオーバーヘッドマウント
三脚でSNSコンテンツ向けの縦向きモードに簡単切り替え。 EMEET STUDIOの自動画像回転機能でオーバーヘッドマウントも可能。

自分好みに調整できるビューティー機能
EMEET STUDIOは、美肌補正、肌色トーン調整、小顔効果、デカ目効果、シャープネス、クリアさの調整機能を搭載。

Web会議もライブ配信も、もっと美しく
お好みに合わせて細かく調整でき、オンライン会議やライブ配信でも、いつでもベストな印象を演出します。

こんな方に最適


TECH SPECS
CAMERA
Dual Camera:
Imaging Camera x1
AI-Assisted Camera x1
AI-Assisted Camera x1
VIDEO
Image Sensor:
Sony 1/2.55" Image Sensor
Effective Pixels:
8 million pixels
Video Coding Format:
MJPEG, YUY2, H.264
Video Resolution:
MJPG:
16:9:
3840 x 2160 @ 30FPS
2560 x 1440 @ 30FPS
1920 x 1080 @ 30FPS
1920 x 1080 @ 60FPS
1280 x 720 @ 60FPS
1280 x 720 @ 30FPS
1024 x 576 @ 60FPS
1024 x 576 @ 30FPS
640 x 360 @ 30FPS
640 x 360 @ 60FPS
16:9:
3840 x 2160 @ 30FPS
2560 x 1440 @ 30FPS
1920 x 1080 @ 30FPS
1920 x 1080 @ 60FPS
1280 x 720 @ 60FPS
1280 x 720 @ 30FPS
1024 x 576 @ 60FPS
1024 x 576 @ 30FPS
640 x 360 @ 30FPS
640 x 360 @ 60FPS
Video Resolution:
4:3:
1280 x 960 @ 60FPS
1280 x 960 @ 30FPS
800 x 600 @ 60FPS
800 x 600 @ 30FPS
640 x 480 @ 60FPS
640 x 480 @ 30FPS
YUY2:
640 x 480 @ 30FPS
640 x 360 @ 30FPS
H.264:
1920 x 1080 @ 30/60FPS
1280 x 720 @ 30/60FPS
864 x 486 @ 30/60FPS
640 x 360 @ 30/60FPS
2560 x 1440 @ 30FPS
1280 x 960 @ 60FPS
1280 x 960 @ 30FPS
800 x 600 @ 60FPS
800 x 600 @ 30FPS
640 x 480 @ 60FPS
640 x 480 @ 30FPS
YUY2:
640 x 480 @ 30FPS
640 x 360 @ 30FPS
H.264:
1920 x 1080 @ 30/60FPS
1280 x 720 @ 30/60FPS
864 x 486 @ 30/60FPS
640 x 360 @ 30/60FPS
2560 x 1440 @ 30FPS
Aperture:
F/1.8
Field of View:
97°
Focus Type:
Fixed
HDR:
Support
White Balance:
2300K-7500K
Exposure Value:
-13~-3
AUDIO
Microphone:
1 built-in microphone
Audio Modes:
Original Sound Mode
Noise Canceling Mode
Noise Canceling Mode
GIMBAL
Pan Range:
±150° (310°)
Tilt Range:
±90° (180°)
CONNECTIVITY
Audio Codec:
PCM, AAC
Network Support:
2.4G / 5G
LTE:
None
RTMP Support:
Yes
USAGE
Battery Life:
8 hours
Size:
78.50mm x 78.50mm x 128.00mm
Weight:
440g
Color:
Black
Provided Interfaces:
Micro SD slot
Waterproof:
No
Memory Card Type:
MicroSD
Maximum Support:
1TB
Includes Memory:
No
Operating Temperature:
0°C~40°C
Remote Power On/Off:
Through USB-C charging cable
Installation:
Supports 1/4" screw hole
Supports NDI:
No
Gesture Control:
Support
Software:
EMEET STUDIO
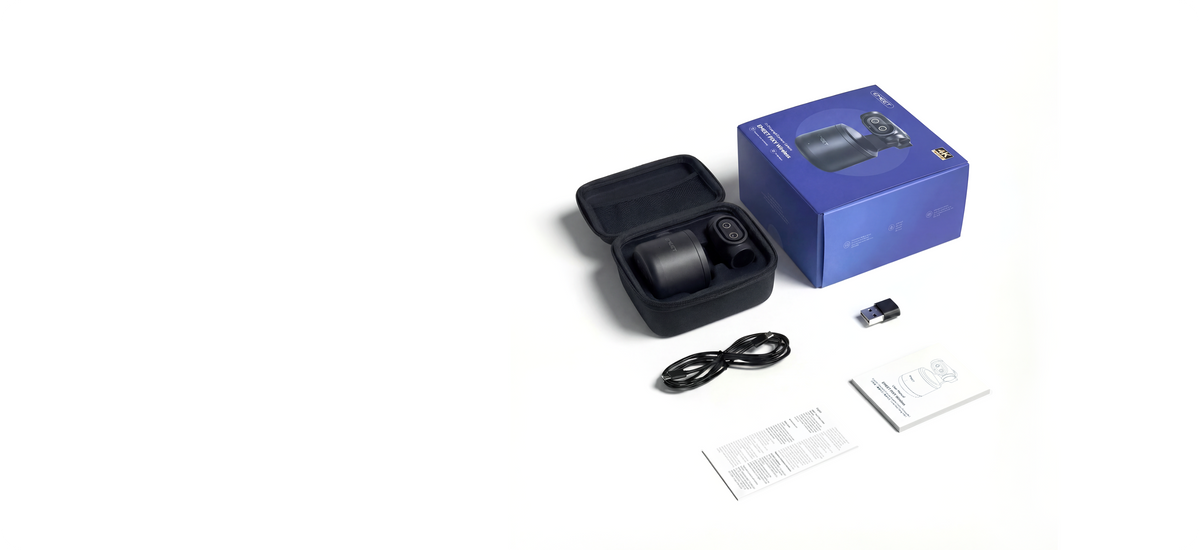
What's in the box?
- EMEET PIXY Wireless
- Portable Storage Bag
- Packaging Box
- USB-C Cable (1.5m)
- USB-C to USB-A Adapter
- User Manual
- Safety & Warranty Policy
FAQ
Have a Question?
EMEET PIXY Wireless
4K HDR高画質、完全ワイヤレス&AI 自動追跡で自由な撮影体験
What are the requirements for SD cards on PIXY Wireless?
PIXY Wireless recommends using U3-class micro SD (TF) memory cards; the device supports exFAT and FAT32 formats, does not support NTFS format, and can support a maximum capacity of 1TB.
How to insert/remove the SD card?
Insertion: Place the micro SD card with the metal contacts facing down and push it smoothly into the card slot until it clicks into place;
Removal: Gently press the installed micro SD card inward, the card will pop out automatically, and then it can be removed.

How to use PIXY Wireless alone to record to an SD card?
Mobile: Open the EMEET STUDIO APP, enter "Camera Settings", and set the button function to Start Recording (SD Card);

PC: Open the EMEET STUDIO software, click "Assistance", and set the function to Start Recording (SD Card) in the "Single Press Power Button" option.

After the settings are completed, short-press the camera's power button to start recording, and the indicator light below the lens will turn red; short-press the power button again, and the color of the indicator light will change, indicating that the recording has ended.
USER MANUAL
EMEET PIXY Wireless User Manual
Download Now
- Choosing a selection results in a full page refresh.